
[ad_1]
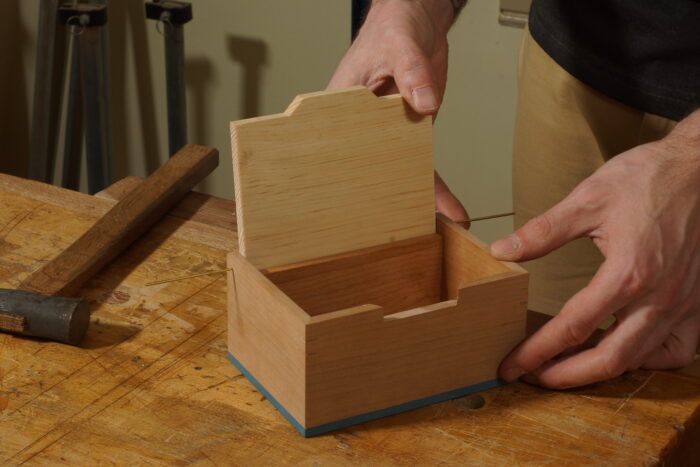
Of all of the methods to high a field, I’ve two favorites in the meanwhile. Each, thankfully, self-register the lid with out pricey hinges (and low-cost ones are greatest left for store tasks). The primary technique is a depraved sensible rabbet that you simply begin earlier than sawing the miters. The second, less complicated one is the one I used on my field in “Make a Field with a Constructed-in Hinge” in FWW 303. This lid has a tab in entrance that barely overhangs a notch within the field entrance. The field’s the lowered, inset again acts as a cease and permits the lid to take a seat within the notch. Executed proper, flicking the lid open and shut is properly satisfying. The field was initially meant as a salt cellar, so it’s meant to open effortlessly whilst you’re busy cooking. Seems it’s enjoyable to fidget with too.
For a candy match, you’ll make the lipped lid, hint it to the glued-up field, and minimize the notch. The router desk was my greatest good friend right here, since I might make use of some particular bits to make slicing the lip and notch a lot simpler and cleaner. (For many who’ve been tuned in to my earlier weblog on this field, this course of is an up to date model of that. Each strategies work, however forming the lid first, as I do right here, is for positive an enchancment.)
The bit for the lid’s a forty five° flat-bottom V-groove bit with a 1/2-in. shank. I needed the tab to be centered, so I flipped the workpiece between passes whereas feeding it face first into the bit. The method is pretty easy: minimize with every finish in opposition to the fence, faucet the fence away a bit, and minimize each ends once more. Repeat till the lip’s the width you need. As a result of this bit has cutters throughout its flat high that angles down the face at 45 deg., it varieties an ideal notch.
There are two security issues, nonetheless. First, bury the bit right into a zero-clearance fence to start out. When you’ve got a break up fence, this closes up what could be the huge, unsafe hole wanted for the huge bit. The lid’s skinny, so it’d have loads of likelihood to slide into the opening.


Second for security, use a considerable backer block. It’ll additionally soak up blowout with every minimize.


I’ve one step earlier than tracing the lid, which remains to be barely overly huge and lengthy at this level. I shoot every finish to suit the field opening, which is glued up by now, whereas holding the desk centered as greatest I can. I’m taking off shavings, so it’s exhausting to make the lid wildly unsymmetrical. If the field isn’t sq., I trim the ends to suit the angle. I airplane the lid to width simply earlier than set up.
Now, hint the lid and mark the depth of the notch.


You’ll rout the notch to last form with an 1/8-in.-long sample bit, which suggests sawing its ends and many of the waste between first. There’s not a lot room to function, so watch out as you’re employed. Noticed the ends of the notch, then cope out the waste.


If you rout the waste, take baby-size nibbles. For one, it’ll stop blowout on the within of the field. But it surely’ll additionally hold you secure, since feed path’s a little bit advanced up and down the notch’s angled ends. The much less materials you take away on every move, the safer you’ll be.

As you close to your format line, put the lid in place to test the notch’s backside and field’s again are in the identical airplane. You may also monitor the bit top in opposition to the again’s high edge, however once more confirm the setting with the lid within the notch.
With the notch at last depth, refine its ends in order that they run parallel with the lid’s notch. I like sticky-backed sandpaper adhered to the flamboyant of wood a wood strip. For gross modifications, take into account a chisel and loads of care.


When the notch is finished, test to see how a lot the lid overhangs the again at every finish. Airplane it to suit, noting any angle if the field isn’t sq..


The field makes use of two brief lengths of brass rod as hinges, that are positioned so the field’s again acts as a cease. I don’t see why customary barrel hinges wouldn’t work simply as effectively too.

Join eletters as we speak and get the most recent strategies and how-to from Superb Woodworking, plus particular gives.
[ad_2]