
[ad_1]
April 13, 2024 at 12:00 p.m.
By IKO.
Study why drip edges are key to constructing a safe shingled roof and find out how to set up them.
Editor’s observe: Share this text along with your clients to assist them perceive the significance of roof flashing on their constructing.
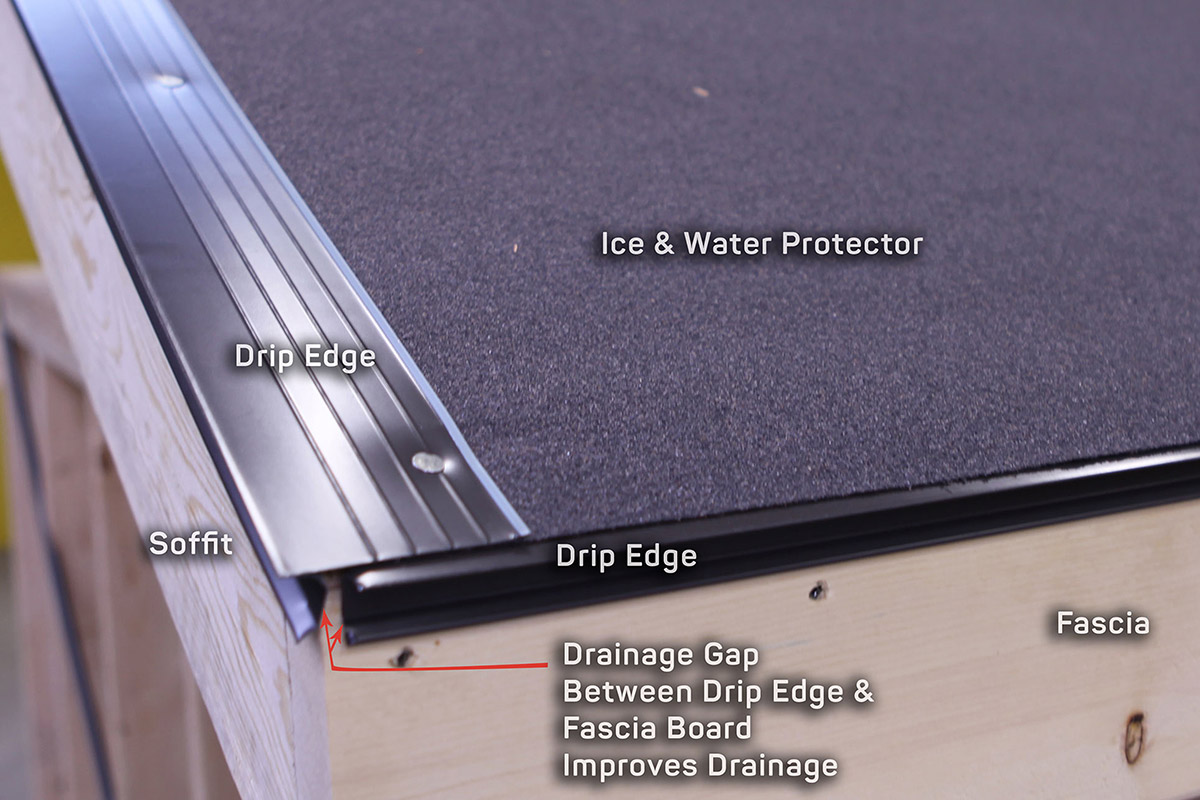
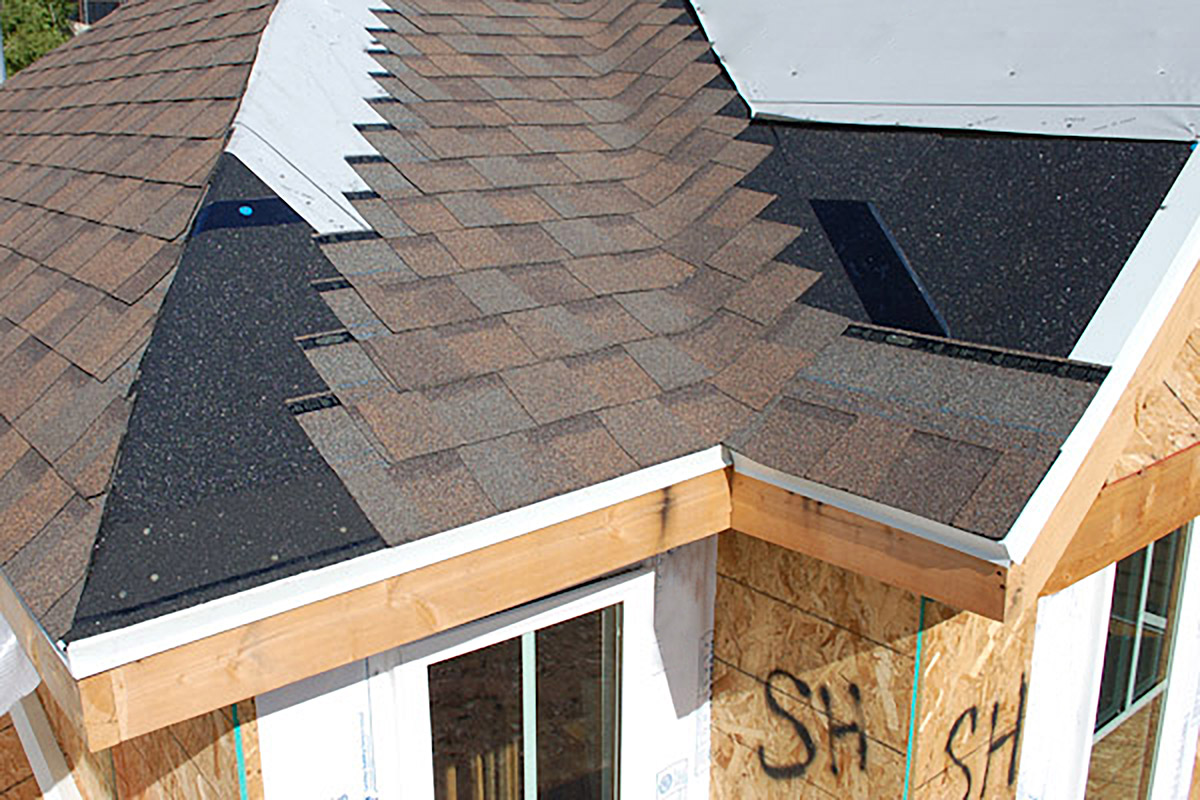
Drip edges, additionally known as edge flashing or D-metal, are vital to each dwelling, whether or not it’s a brand-new construct or an older household dwelling. These are key elements of the roofing system that maintain water from getting beneath the shingles of a house. That is essential as a result of the listing of points that come from undesirable moisture between a house and shingles contains leaks, decreased insulation, rotting and elevated vitality prices. However, drip edges provide a simple solution to keep away from these issues.
Drip edges are steel sheets which might be usually within the form of an “L”. They’re put in on the sting of the roof and direct water away from the fascia beneath the shingles and in direction of the gutter to be drained correctly off your house. Even when your house was not initially constructed with a drip edge, it’s now a requirement by most constructing codes throughout the nation to assist shield houses. Check out the information put collectively by IKO to higher perceive drip edges and the position they play in a roofing system.
What’s the aim of roof drip edges?
Drip edges have two key functions:
- Direct water away from fascia: As a consequence of cohesion, floor stress and different forces, water droplets have a tendency to stay to 1 one other and to the surfaces they’re on, albeit barely. A drip edge is designed to benefit from these forces and, together with gravity, direct water into the gutter. If the house has no gutter, the drip edge will forestall the water from operating down the fascia and onto or into the soffit cavity. Nevertheless, with out the drip edge, the water sticks to shingles, probably working its approach below the shingles to trigger a leak. For instance, water might cling to the fascia, which can trigger rot, or, in extreme circumstances, a leak into the house.
- Defend from wind-driven rain: When circumstances are critical, the wind pushes water round on a roof. Shingles, together with underlayments and ice and water protector, maintain wind-driven rain from harming the roof’s deck. Nevertheless, on the sides, the drip edge should compete with the wind. Wind can simply push the water upwards earlier than gravity pulls the water down. The drip edge wants to hold considerably off the sting of the roof and has two to 4 inches of decrease flange to fight this. And, in fact, with none drip edge in any respect, wind‐pushed rain may compromise the roof.
Drip edge materials varieties
Drip edges are made of assorted plastics and metals, that are each acceptable below most constructing codes as long as the metals are corrosion-resistant or galvanized.
- Aluminum: A standard materials for drip edges, aluminum isn’t as sturdy as metal. It doesn’t corrode and is usually offered in colours that match the remainder of the house precisely.
- Galvanized metal: Drip edges are designed to keep up a correspondence with water; so, if they’re product of metal, they should be galvanized to stop rust. Minimal 24-gauge metal is preferable in order that the drip edge can stand up to sturdy winds.
- Copper: Copper is a sturdy steel that offers a roof a singular look. When used as a drip edge, it must be a minimal of 0.69 mm or 20 ounces.
- Whereas plastic, vinyl and fiberglass drip edges might also be obtainable in your space, these supplies are greatest suited to use in nonroofing functions, reminiscent of above doorways and home windows.
Drip edge profile varieties
 There are three fundamental profiles of drip edge flashing, however every goes by multiple title, which could be complicated.
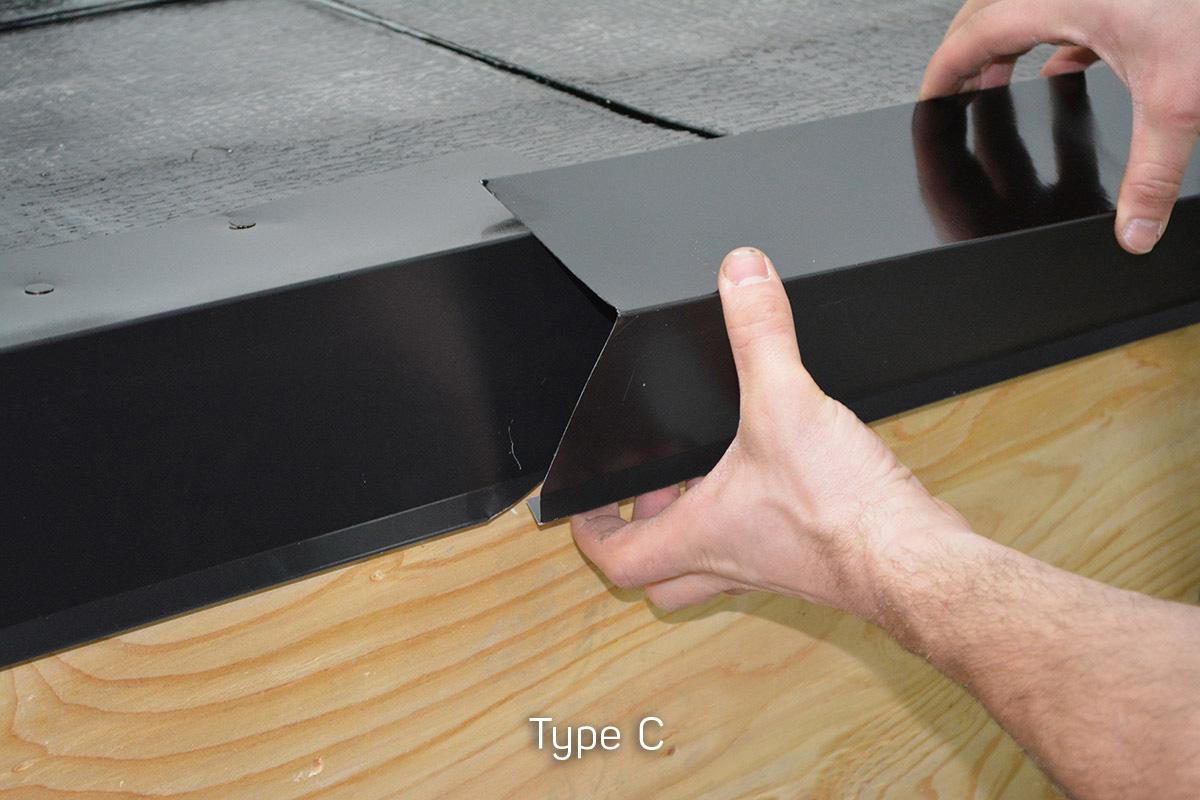
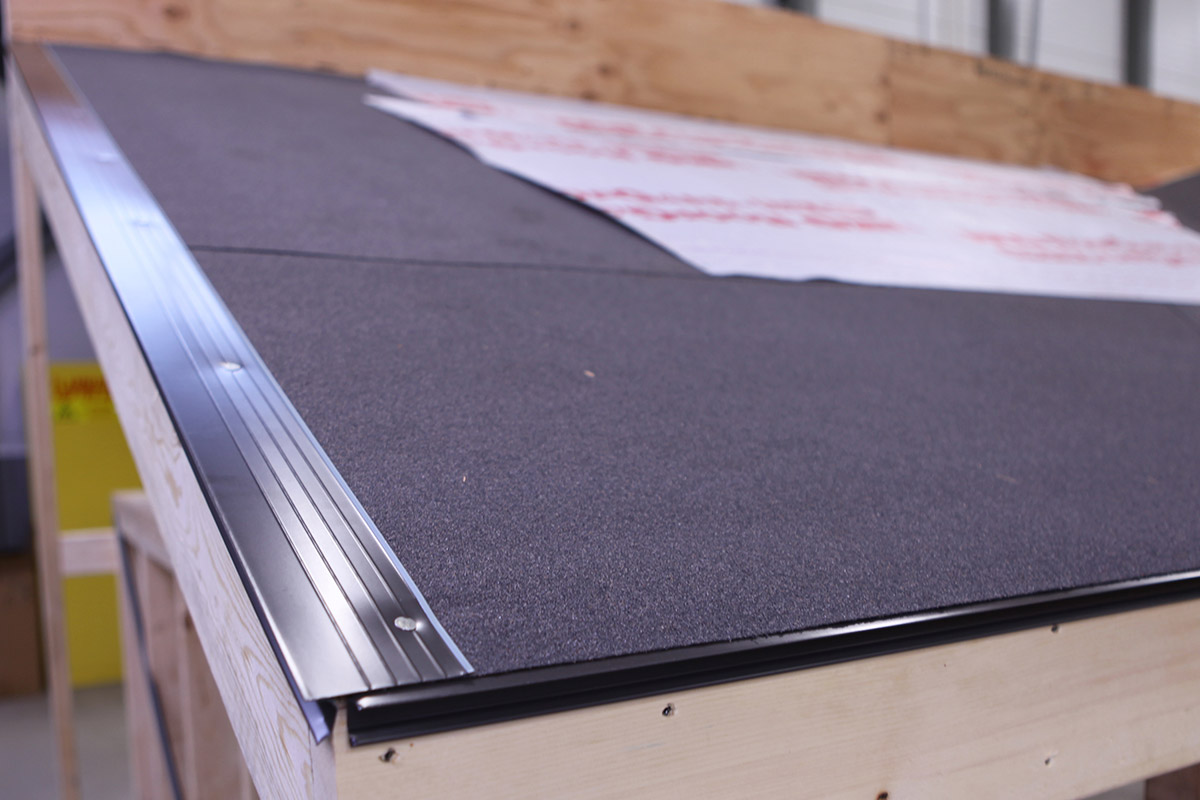
- Sort C: That is the basic “L”-shaped drip edge, generally known as “L fashion.” This drip edge is bent to a 90-degree angle and has a decrease flange on the backside.
- Sort D: This profile of drip edge is formed like a “T,” with a decrease flange on the backside. Typically it’s known as drip steel, “D-metal” or “T fashion.” The Asphalt Roofing Producers Affiliation (ARMA) prefers this drip edge profile to Sort C as a result of it retains the water additional away from the fascia. Nevertheless, Sort C continues to be acceptable in line with most constructing codes.
- Sort F: That is an prolonged drip edge that has an extended vanguard, which is beneficial when putting in new drip edges over current shingles or on rake edges. This profile is often known as “F fashion” or “gutter apron.”
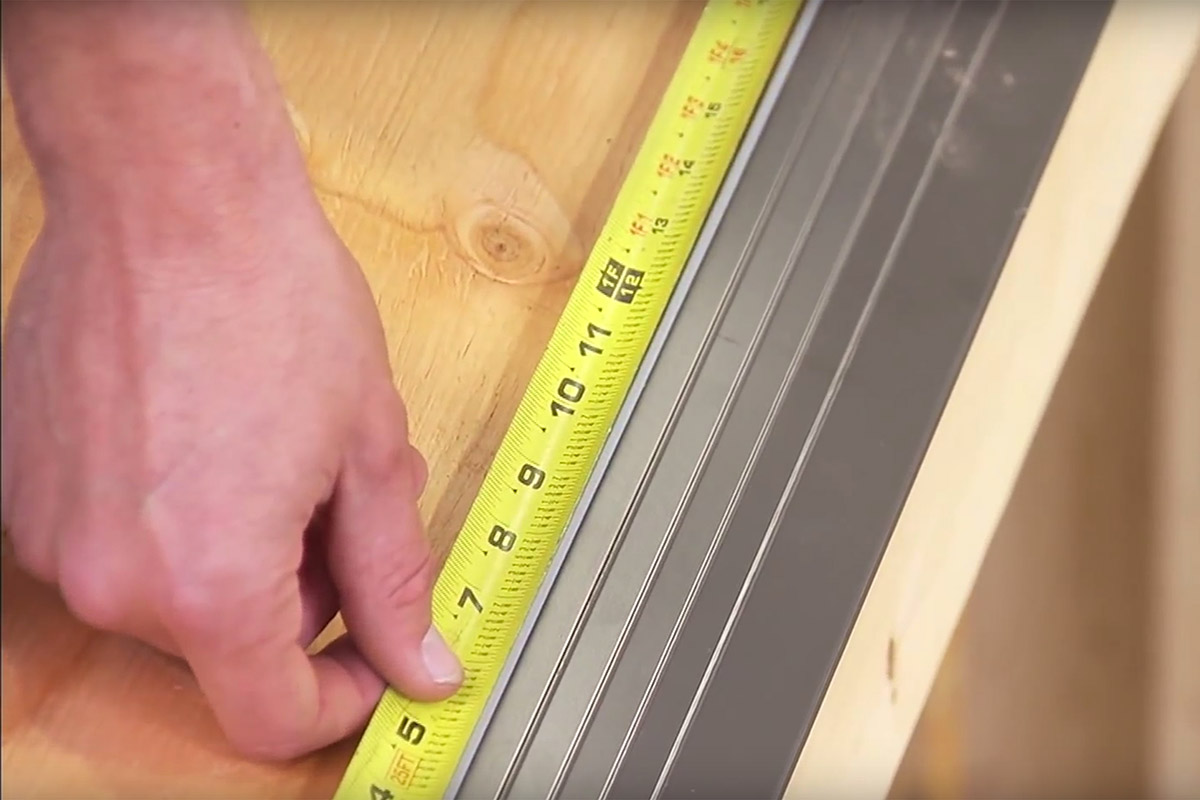
Roof drip edges are typically offered in 10.5-foot lengths, however they’re often offered in 8-foot lengths or smaller. The size of the overhang itself generally ranges from 2 to five inches. Chances are you’ll discover different sizes and styles of drip edges within the retailer, together with “J-channel” drip edges, however these are meant for home windows, doorways and different functions. You may additionally discover vented drip edges, however the Nationwide Roofing Contractors Affiliation (NRCA) doesn’t suggest utilizing them on roofs. 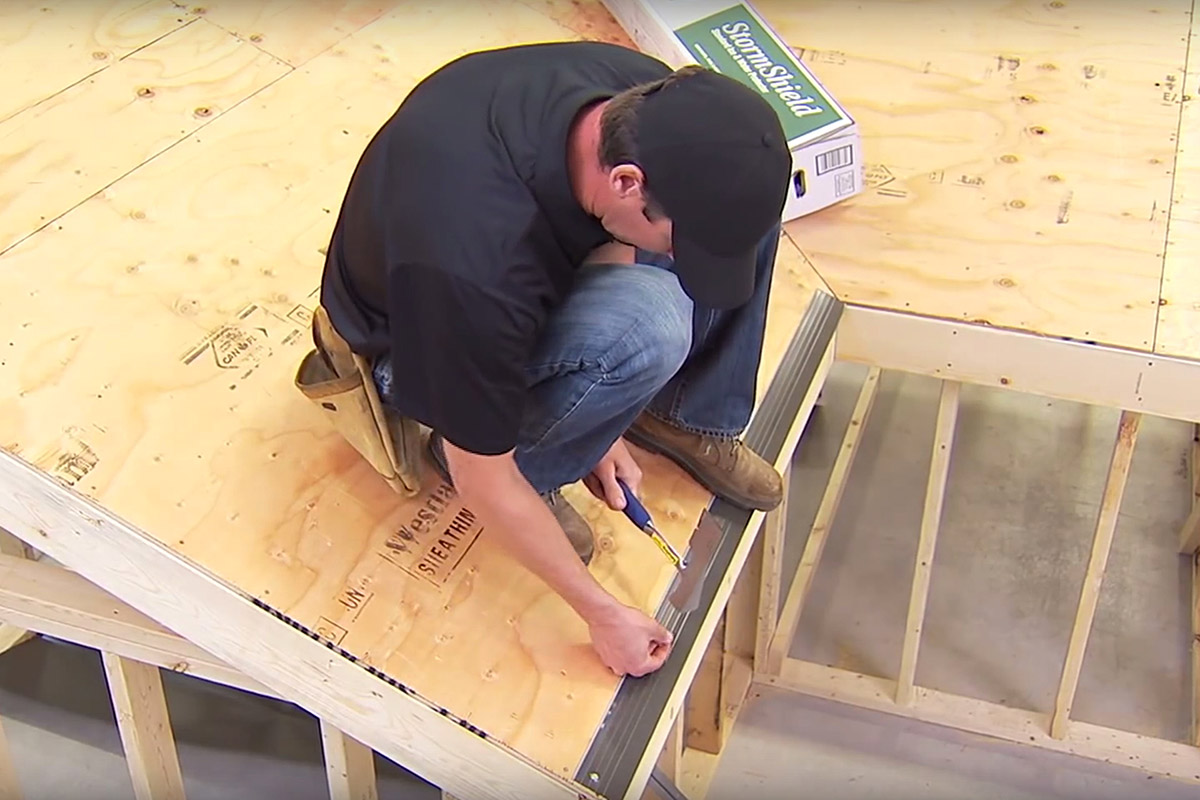
Find out how to set up a drip edge
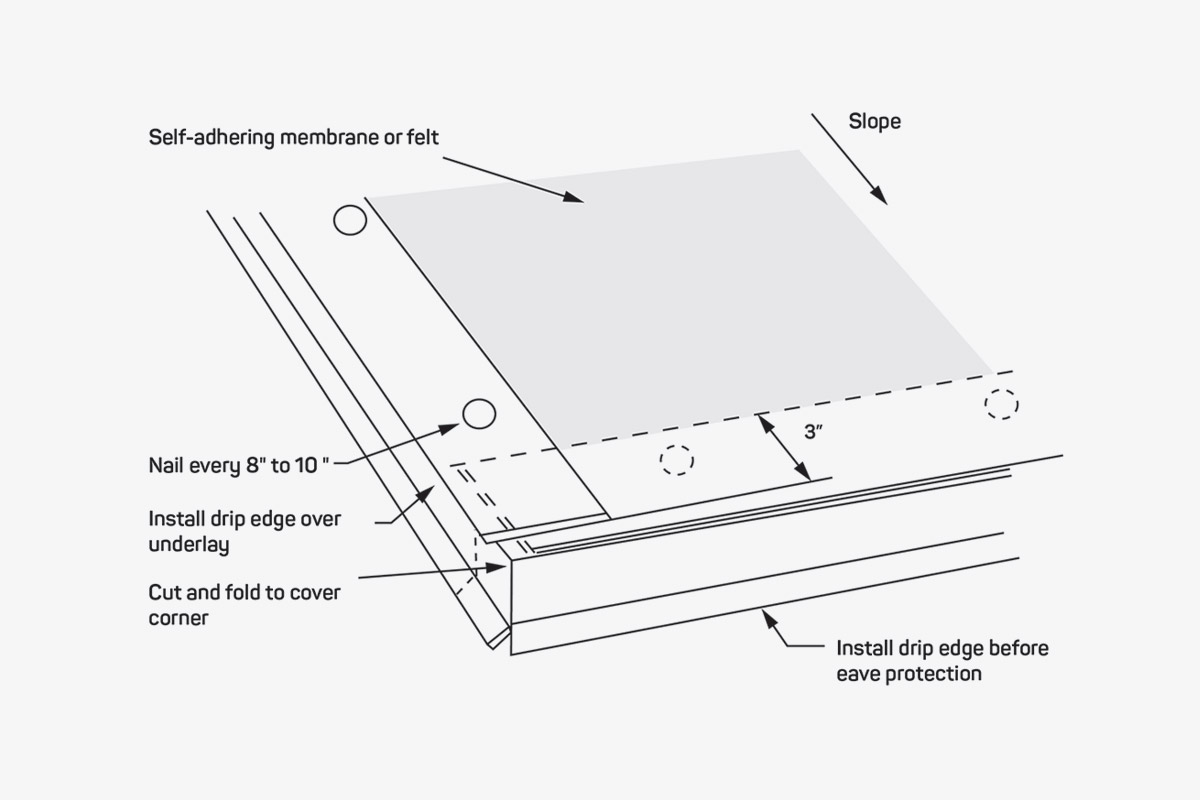
It’s vital to know that drip edge set up is completely different for eaves and rakes. After your roof deck has been ready, and prior to installing underlayment, you’ll want to set up drip edges on the eaves. You put in drip edges on the rakes after you put in the underlayment. Plus, this step-by-step information to drip edge set up can even clarify find out how to lower drip edges for corners and peaks.
 If utilizing a Sort C drip edge, you possibly can set up a furring strip to extend its efficiency. A furring edge is a strip of one-by-two wooden you put in on the vertical floor of the home simply beneath the roof’s edge. While you set up the drip edge over this strip, it retains the decrease flange farther from the house’s siding, which helps to maintain water farther from the house.
-
Set up drip edges on the eaves first. Place the drip edge down, aligning it so water will drip into the gutters. The top with the flange or flare ought to level down and away from the roof.
-
 Use roofing nails to safe the drip edge. Nail excessive up on the drip edge in order that the shingles will cowl the nails. Ideally, you’d nail about each 12 inches, and in no circumstances ought to you’ve 16 inches or extra between nails. While you place the following drip edge piece, it ought to overlap the primary by an inch.
-
While you attain a nook the place an eave and rake edge meet, you’ll want to make a lower to make sure a correct match. First, place your drip edge on the rake edge. Mark the place the drip edge begins to overhang and one inch additional out from that overhang.
-
 Lower the whole drip edge by your second mark, in order that it solely hangs previous the sting by an inch. Then, lower out the topmost portion of the drip edge by your first mark. Then, make a perpendicular lower, in an effort to take away a sq. of the drip edge, as you see within the picture under.
-
Set up the drip edge as regular. Then, bend within the flap of the drip edge to type a nook. You’ll full this nook once you set up the drip edges on the rakes.
-
When you’ve coated the eaves with a drip edge, it’s time to put in your underlayment. This fashion, the underlayment is over the drip edge on the eaves, however below the drip edge on the rakes.
-
 Then, set up drip edges on the rakes. Use nails as earlier than.
-
While you get to a nook the place the rake and eave edge meet, merely set up the rake’s drip edge on prime of the flap you left when putting in the eave’s drip edge.
-
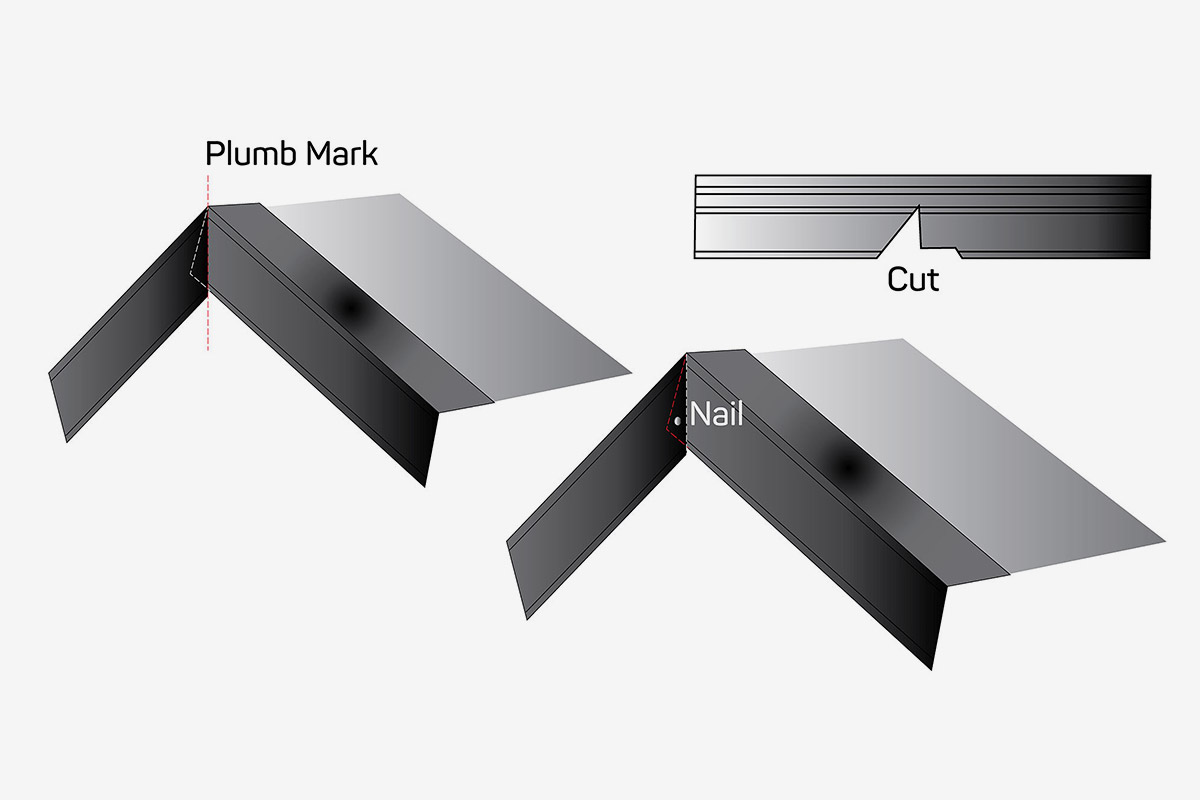
While you attain the roof’s ridge, you’ll want to make one more lower in your drip edge. Maintain the drip edge as much as the ridge and make a mark alongside the place the drip edge exceeds the roof. Make a straight lower by way of the underside of the drip edge along with your tin snips.
-
Fold the drip edge to suit over the ridge. Mark the plumb line, or centerline, as within the picture under. Lower the topmost a part of the drip edge alongside this line to create a completed look. Place a single nail within the exterior piece to carry the drip edge in place.
It is best to all the time verify along with your native constructing code to see if there are any additional guidelines you’re required to observe throughout drip edge set up.
Find out how to substitute a drip edge on an current roof
What if you’ll want to substitute the drip edge on an current roof or set up a drip edge on an current roof for the primary time? It may be achieved; right here’s how:
- Gently elevate up the shingles on the sting of the roof and find the nails holding the prevailing drip edge onto the roof.
- Use a flat pry bar and hammer to pry the nails out of the drip edge gently.
- As soon as free, slide the drip edge out and discard.
- Set up the brand new drip edge as described above, with cement and nails. You’ll have to ask one other roofing skilled to carry up the shingles when you achieve this.
- Simply as with putting in drip edges on new roofs, you need to verify along with your native constructing codes to see if there are particular guidelines it’s a must to observe about drip edge alternative.
In years previous, many constructing codes didn’t require drip edges; however the roofing group realized that these comparatively cheap merchandise make an enormous distinction within the efficiency of the roof. By putting in drip edges correctly, you’ll be giving your clients a greater roofing system.
Authentic article supply: IKO
[ad_2]